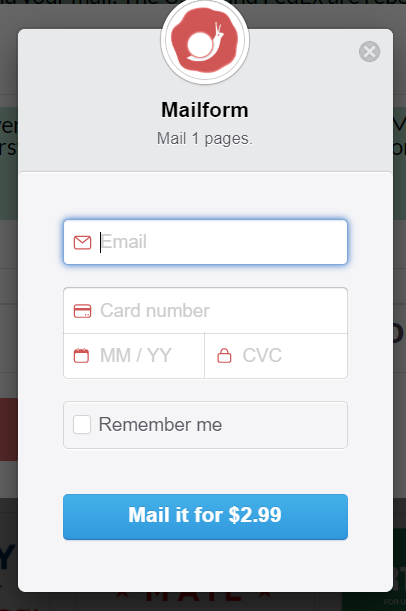
Mailform is the easiest way to send and track USPS Certified Mail
Have you ever needed proof that the letter you sent reached the recipient? Whether you're sending mail to a business associate or personal acquaintance, using the USPS certified mail option can assure you that your letter was received. Thanks to mailing services like Mailform, you can easily send and track certified mail electronically without having to go to the post office.
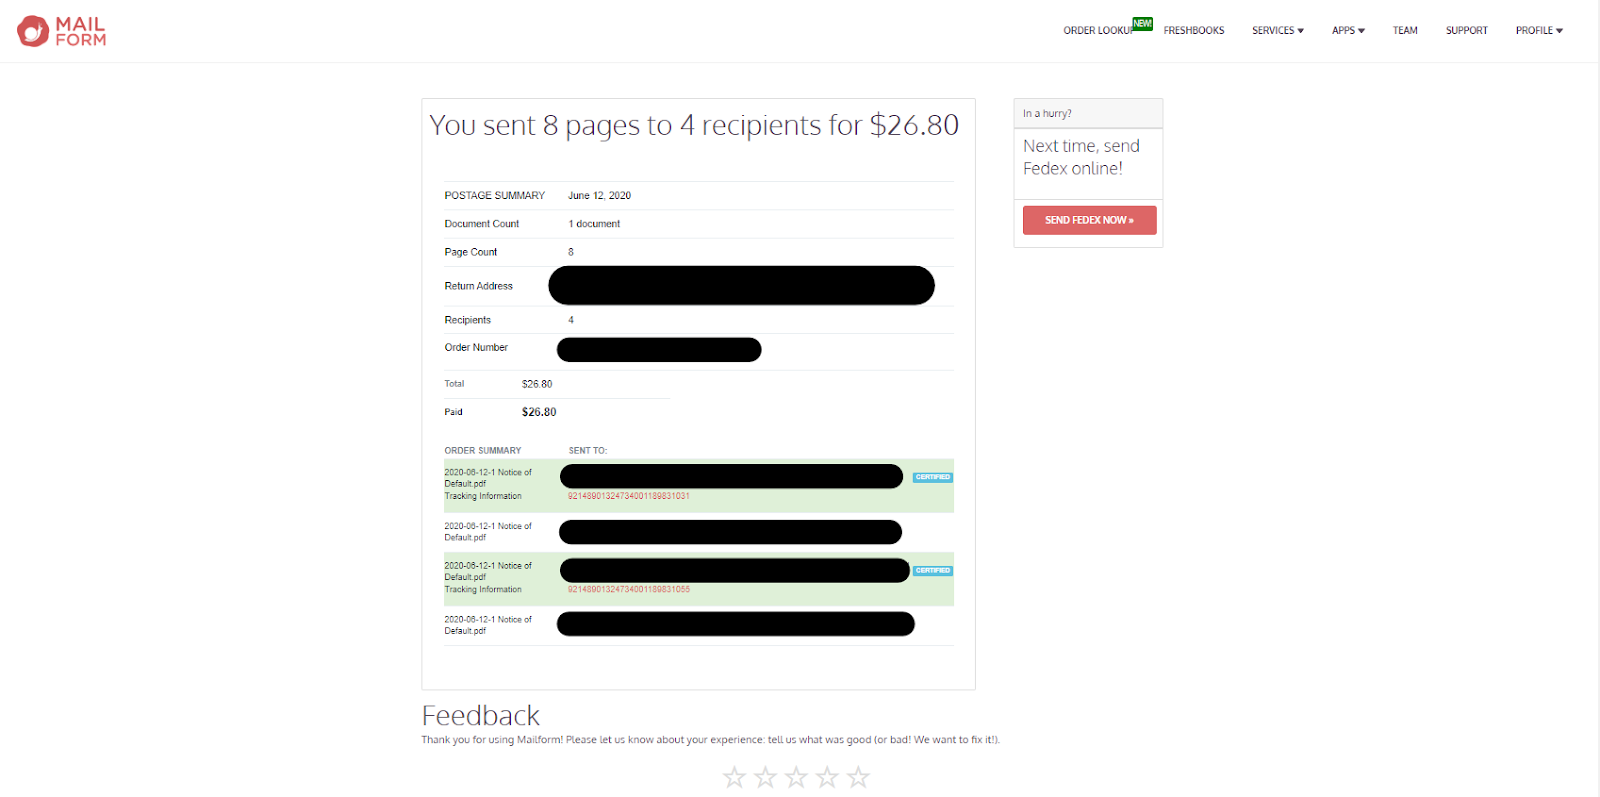
Click here for Bulk Mail or Click here to send a Single Letter tool and track your certified mail right from our receipt page:
What Is Certified Mail?
Certified mail is a special service offered through the United States Postal Service (USPS) that allows you to mail sensitive documents securely. When you send letters or packages by certified mail, the mail carrier is required to get a signature from the recipient to prove that the mail you sent was delivered. As a result, you'll have proof as to whether or not a letter or package was delivered.
How Does Certified Mail Work?
When a piece of mail is sent by certified mail, the postal carrier must get a signature to deliver the letter or package. That means this type of mail can't be left in a mailbox.
Certified mail can also be mailed to a post office box address. In this case, a card is placed inside the post office box so the recipient knows they have received a certified letter or package. The recipient then needs to present the card they received to the clerk at the post office counter to sign for their mail.
When you send certified mail, you'll receive a tracking number. You can use this tracking number to follow your letter through the delivery process, including delivery, attempted delivery, or refusal. You'll also be able to view the date and exact time your mail was delivered and who signed for it.
You can find the delivery status of certified mail by:
-
Entering your tracking number at the USPS Tracking website
-
Contacting USPS by phone and giving them your tracking number
-
Using bulk electronic file transfer (only for mailers who provide USPS with an electronic manifest)
Who Uses Certified Mail?
Anyone in the United States can send certified mail. While sometimes an individual may want to send an important legal document or a letter that shows you've been trying to contact a company, businesses tend to use this service more.
Legal documents, such as mail from the IRS, attorneys, debt collectors, and more, are commonly mailed by certified mail. The tracking system allows you to know where a document is and the attempts at delivery for when you’re sending critical information. Certified mail tracking receipts also can be used in court as evidence if needed.
Beyond legal reasons, certified mail gives senders peace of mind since it lets them know important mail was delivered and not lost. This type of letter stands out and grabs the attention of the recipient, so it doesn't get overlooked among other mail received. It also can help senders with record keeping.
5 Benefits of Using Mailform to Send Your Certified Mail
Mailform saves you time and makes it easy to send mail on your schedule. Plus, Mailform's ordering process ensures you don't forget to select all the mailing options you need.
1. Mailform Saves You Time
With Mailform, you can quickly and easily send mail from your computer, including certified mail, without having to head to the post office, wait in line, and then travel back to your office or home.
Additionally, filling out the forms is quick and easy using Mailform's platform, so you can avoid handwriting the certified mail forms like you have to do at the post office.
2. Sending Certified Mail From Your Computer Is Convenient
If you have a computer and internet access, you can send your mail no matter where you are or what time of day it is. You simply convert the documents or information you want to mail into PDF files. Then, use Mailform's website to send them quickly with the touch of a button.
3. You'll Never Forget to Select the Return Receipt Option That's Best for You
When mailing letters at the post office, it's easy to forget to ask for every service that you need—especially requesting a return receipt.
A USPS return receipt will give you a copy of the proof that the mail you sent was delivered to the recipient. This receipt gives you peace of mind that your information arrived safely.
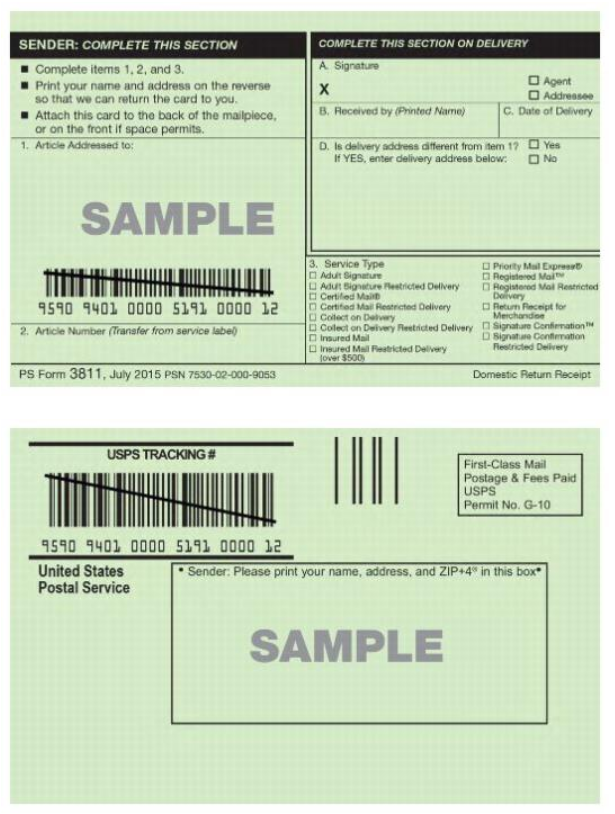
You can choose to receive the receipt by email or by physical mail when you order this service. If you receive your receipt by mail, you will be sent a green postcard called a PS Form 3811. This is an example of the USPS return receipt proof of delivery card that you'll receive if you choose to have your receipt mailed to you.
A return receipt can be combined with certified mail. However, this service must be requested at the time of mailing. You can’t purchase a return receipt after you've mailed your letters.
Fortunately, Mailform makes it simple for you to select the return receipt option that works for you. During the checkout process, you'll be able to choose whether you want a return receipt. You can choose whether you want the receipt sent to you by email or through the mail.
If you select the option to receive a physical receipt through the mail, the USPS will mail you your PS Form 3811 after the certified mail is delivered. The green postcard will be sent to the sender address, so be sure to enter an address where you can receive the card.
Since USPS completes the physical receipt, Mailform can't give you a tracking number for the PS Form 3811. Mailform will provide you with a tracking number for the original certified letter mailed through Mailform.
4. You Can Send Certified Mail in Bulk Efficiently
Mailform makes it easy to send out bulk mail—even certified mail. You’ll save time and be able to track your certified mail using Mailform's easy-to-use website. If you need to mail certified letters or any letters in bulk, you will need to sign up for an account. Otherwise, the process for sending bulk mail is as simple as if you are sending only one letter.
Plus, if you're mailing letters to five or more recipients, you may qualify for a discount.
5. You'll Always Know How Much It Costs With Our Easy-to-Understand Pricing
While some surprises are fun, being surprised about how much it will cost to mail your letters when you go to check out is not. We understand, so we strive to make it easy for you to know how much our services cost throughout our process.
Our prices are always available on our pricing page. You will receive feedback on how much it costs to mail your documents as USPS First Class mail as you upload your PDFs. If you need to send your letters using other services, like Priority Mail or FedEx, the cost will be updated and clearly listed before you go to check out.
We do offer reduced pricing for bulk orders or for frequent low-volume orders. You can email us to learn more about our discounts.
How to Send Certified Mail With Mailform
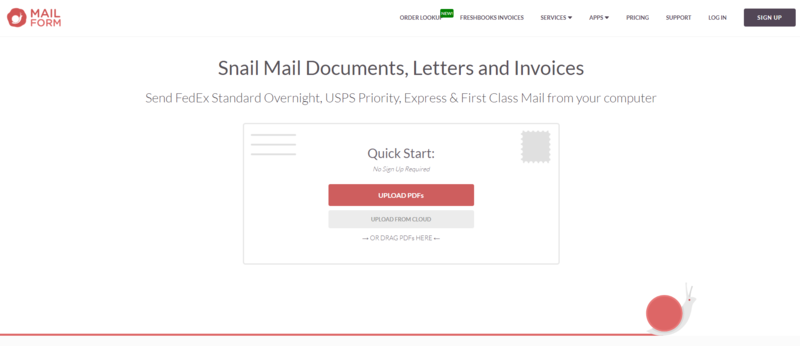
Mailform makes it easy and convenient to send certified mail from your computer, which saves you time. As long as you aren't mailing in bulk, You can even use our Quick Start option, which doesn't require you to sign up for an account.
1. Upload Your Document, Letter, or Invoice as a PDF From Your Computer or the Cloud
You can conveniently upload a PDF form of the documents you want to mail from your computer using the Quick Start feature. You don't need to sign in. Alternatively, you can sign in to Mailform if you do have an account. Uploading is easy and only takes a moment.
The information you're mailing needs to be in PDF format. You can upload the PDF directly by selecting the Upload PDFs button or by dragging the PDFs into the Quick Start space. You also can upload from the cloud using the Upload From Cloud button.
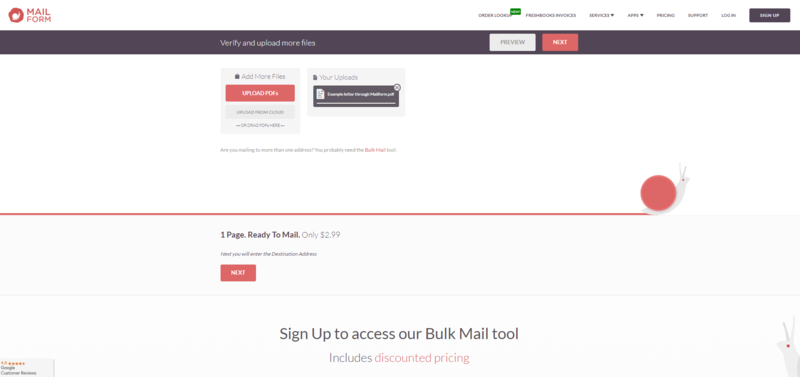
2. Verify the Information Was Uploaded, and Upload Additional Pdfs If Needed
After uploading a PDF through the Quick Start option, you'll then see the uploaded file and have the option to upload additional PDFs if needed. The price to mail your upload will be calculated at the bottom of the screen. After uploading all the PDFs you need to send, click the Next button.
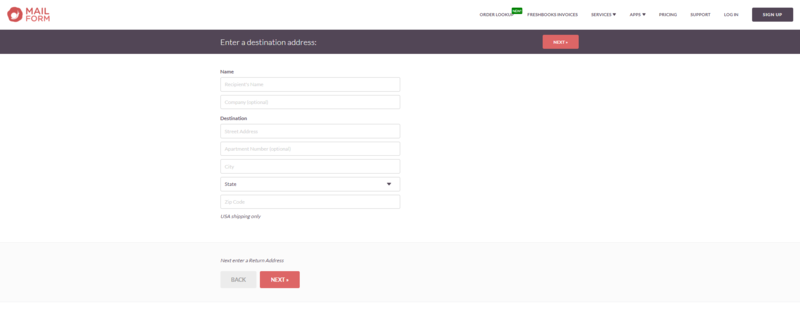
3. Enter the Destination Address
Now, you'll enter the destination address and then click the Next button. The destination address is the recipient's address—in other words, the address of the person that you're mailing the certified mail to.
You will be required to enter the recipient's name, the street address, city, state, and zip code. You can also add a company name and an apartment number.
If necessary, you can mail a certified letter to a post office box address. The recipient will receive a postcard letting them know that they have a piece of certified mail to sign for at the post office counter.
Currently, you can only ship certified mail in the United States.
4. Enter the Return Address
Now you'll enter a return address. This is the address you want the mail to go if it can't be delivered to the destination address. You will be required to enter the sender's name, street address, city, state, and zip code. You also have the option to add a company name and an apartment number. Be sure this is an address that allows you access to the returned mail.
When you're done, click the Checkout button.

5. Select the Delivery Method, Request Any Additional Services (Like a Return Receipt) and Review Your Order
On the next screen, you'll first select how you want your mail delivered. Choose your delivery speed and preferred carrier. At this stage, you can select the option for USPS Certified Mail if you want to send certified mail. Your certified mail will be fulfilled within two business days and arrive in four to eight business days.
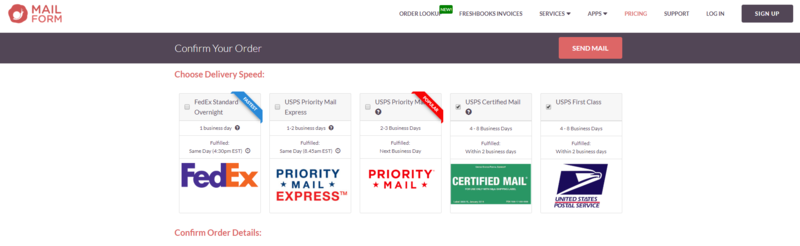
Next, you'll be able to review the destination address and return address that you entered in the previous steps. You’ll also be able to see and review the PDFs that you uploaded to be mailed. You can even preview the documents you’ve uploaded by clicking Preview This Document.
At this stage, you can also select additional services. There are several options you can choose to tailor the mail you're sending, including:
-
Printing your mail in color (note: the default option is for documents to be printed in black and white)
-
Printing your mail as single-sided (note: the default option is for documents to be printed double-sided to save paper)
-
Using a flat envelope
-
Including a return envelope
-
Requesting a return receipt
If you want a return receipt, you will need to check the box for the option you'd like:
-
Request Electronic Return Receipt: allows you to receive the receipt information by email
-
Request Physical Return Receipt: allows you to receive the green postcard (PS Form 3811)
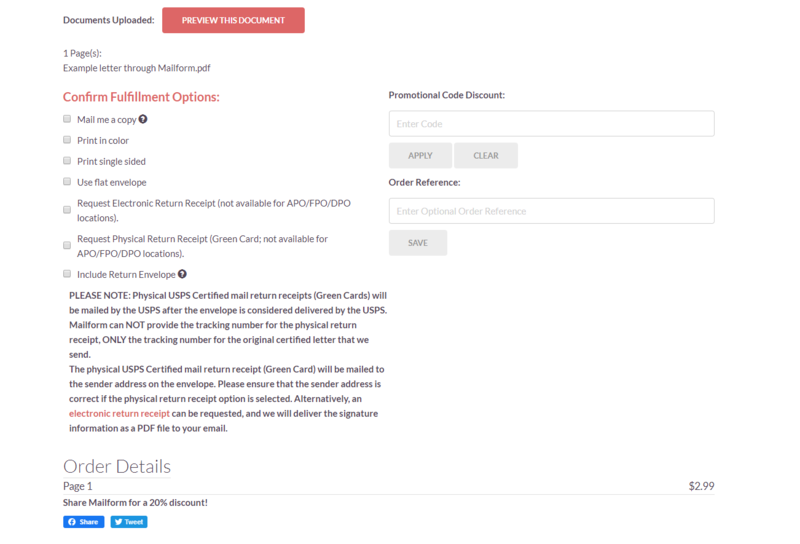
After you have selected all of the additional services you’d like, click Send Mail.
6. Complete the Checkout Process and Send Your Mail
After clicking the Send Mail button, a pop-up screen will appear that displays the total you have to pay. You have the option to pay with a major credit card or by using PayPal.
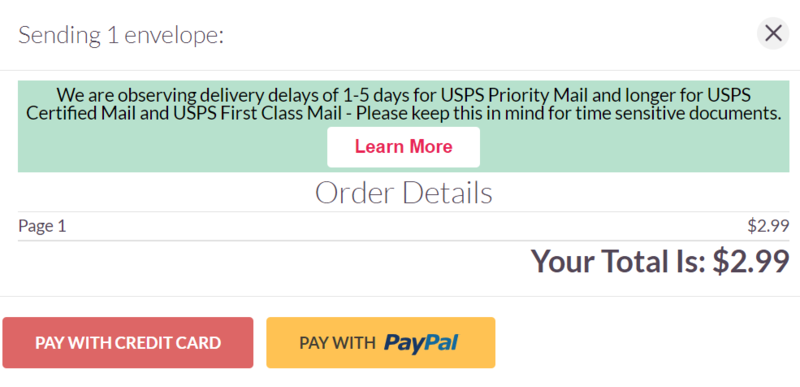
If you're paying through your PayPal account, you'll be redirected to PayPal, where you'll log into your account using your email address and password. If you don’t already have a PayPal account, you can sign up for one for free. You'll then be able to set up a payment source and then make your payment to Mailform.
If you're paying by credit card, another pop-up window will appear to allow you to enter your email address and credit card information.
7. Mailform Will Process Your Order and Send Your Mail
After you complete the payment process, you're done. Mailform will process your order, and you will be sent your USPS Tracking Number by email.
How long it will take for your order to be sent to the USPS will vary depending on the options you’ve selected and on the USPS. Certified mail will typically be fulfilled within two business days. Please note that the delivery of the certified mail to the recipient is subject to the USPS delivery process. If you selected the option to receive a return receipt by email or mail, that will be handled by the USPS.
How to Track Your Certified Mail Sent Through Mailform
Mailform makes it easy to access your certified mail tracking number. We will email you your USPS tracking number as soon as it’s available so you can follow the entire delivery process.
You’ll never have to worry about keeping track of a printed shipping receipt like you do when you go to the post office to mail certified letters. You'll always be able to find and easily access your tracking number in your confirmation email from Mailform.
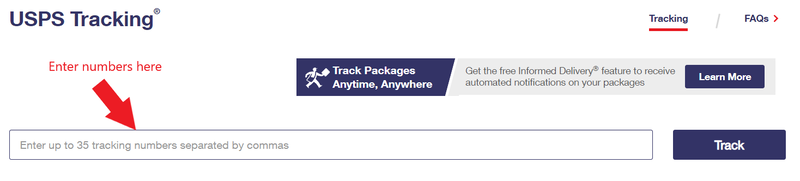
Using your USPS tracking number on the USPS Tracking website is easy.
-
Once you have your certified mail tracking number, go to the website.
-
To track your certified mail, enter your tracking number into the provided field. You can submit up to 35 tracking numbers at a time by separating the tracking numbers with commas. You will only be able to track USPS mail at this website, not FedEx, UPS, or DHL.
-
After you enter in your tracking numbers, hit the Track button. USPS will then show you the status of the sent mail.
Mailform Makes It Easy and Convenient to Send and Track USPS Certified Mail
When you need to send a letter, document, or invoice by USPS certified mail, using Mailform makes the process quick, convenient, and easy so you can get back to your day without the hassle of traveling to the post office.
If you have additional questions about our services, try our Frequently Asked Questions page or contact us with any specific questions you might have. We’re happy to help!